When it comes to ensuring a safe and pleasant driving experience, one crucial element often gets overlooked – your car headlights. Over time, your headlight lenses can become cloudy, reducing visibility and compromising safety. But fear not! Headlight restoration is the answer to this problem and can be done right at your doorstep.
This article explores everything you need to know about headlight restoration, from the techniques to the costs, and whether it’s a job for the pros or a DIY endeavor.
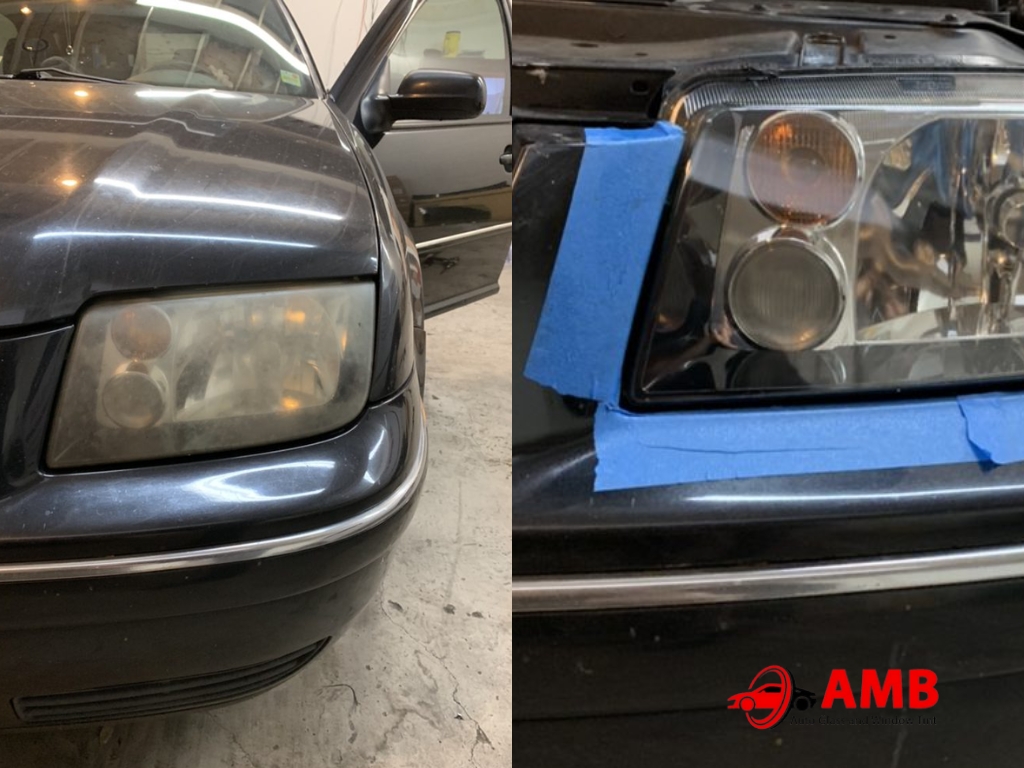
How do you restore cloudy headlights?
Cloudy or hazy car headlights are a common issue for vehicle owners, caused by various factors, including UV damage and oxidation. Restoring headlight lenses is a cost-effective way to improve your driving experience and safety. Here’s a simplified guide to help you understand the process.
Step 1: Gather the Necessary Materials and Tools
Before you embark on this journey, you must ensure you have all the necessary materials and tools. A headlight restoration kit is readily available, and it typically includes the following:
-
Sandpaper or Abrasive Pads: These are essential for removing the damaged top layer of your headlights. Headlight restoration kits usually provide sandpaper with varying levels of grit to address different levels of damage.
-
Cleaning Solution: A suitable cleaning solution is included in the kit to remove surface dirt, grime, and any residual contaminants from the headlights.
-
Polishing Compound: This compound is a vital component of the headlight restoration kit and is used to restore the clarity and shine of your headlight lenses. It effectively removes scratches and imperfections, leaving the surface smooth.
-
Protective Sealant: The final step involves applying a protective sealant to your headlight lenses. This sealant provides UV protection and prevents future damage, such as radiation and oxidation.
In addition to the materials included in the kit, you might also require the following:
-
Masking Tape: To protect the surrounding area of your vehicle from light scratches or damage during the restoration process, use masking tape to create a protective border around the headlights.
-
Microfiber Cloth: A microfiber cloth is perfect for applying the cleaning solution, polishing compound, and sealant. It helps ensure an even application and a streak-free finish.
-
Spray Bottle with Water: A spray bottle filled with water is helpful during the sanding and polishing. It helps keep the sandpaper or abrasive pad lubricated, preventing it from clogging and ensuring a smoother finish.
Step 2: Cleaning the Headlights
Once you have your materials and tools ready, it’s time to start the process. Before you begin sanding and polishing, it’s essential to achieve clean headlights thoroughly. Use the provided cleaning solution and a clean microfiber cloth to remove surface dirt and grime. This initial cleaning step ensures that the restoration can focus on the damage and oxidation, allowing for more effective results.
Step 3: Sanding and Polishing
With your clean headlights, addressing the cloudy or hazy layer diminishing their clarity is time. This is where your headlight restoration kit’s abrasive pads or sandpaper come into play. Follow these steps:
-
Start with a Coarser Grit: Begin with the coarser grit sandpaper or abrasive pad. Gently sand the headlight surface using a horizontal and vertical motion. This step is essential to remove the top layer of cloudy and damaged material. Be cautious not to press too hard, as you don’t want to create additional scratches.
-
Gradually Move to a Finer Grit: Switch to a finer grit sandpaper or abrasive pad as the headlight surface becomes smoother. Repeat the sanding process with the finer grit, continuing to sand in horizontal and vertical motions.
-
Regularly Wet the Surface: During the sanding process, keeping the headlight surface wet is essential to prevent overheating and achieve a smoother finish. Use the spray bottle with water to lightly wet the surface as needed.
This gradual sanding and polishing process removes the cloudy layer and any imperfections, making the headlight surface smoother and clearer.
Step 4: Applying a Protective Sealant
Once you’re satisfied with the clarity and shine of your headlights, it’s time to apply the protective sealant. The sealant helps maintain the restored condition of your headlights and prevents future damage, such as UV radiation and oxidation. Follow the instructions provided with your kit for properly applying the sealant. Typically, this involves evenly spreading the sealant with a clean, dry microfiber cloth.
Step 5: Final Inspection and Testing
Before you conclude your headlight lens project, take a moment to inspect the headlights. They should now appear clear, clean, and significantly brighter than before. To ensure that everything works as it should, take your vehicle for a test drive at night to verify the improved visibility. This final test ensures that your restoration has succeeded, enhancing your vehicle’s aesthetics and safety.
Following these steps and using a quality headlight restoration kit can effectively restore your cloudy headlights, improving your driving experience and safety without breaking the bank.
How much is headlight restoration?
The cost can vary depending on several factors:
-
Type of Vehicle: The size and design of your headlights can affect the price. For example, restoring the headlights of a compact car may be less expensive than restoring those of a larger vehicle.
-
Severity of Headlight Damage: If your headlights are heavily oxidized or have deep scratches, the restoration process may require more time and materials, thus increasing the cost.
-
Location and Service Provider: Prices may differ based on your location and the specific service provider you choose. Urban areas often have higher service costs than rural areas.
-
Additional Services: Some restoration services offer additional services, such as headlight alignment. These can add to the overall cost.
Headlight restoration can cost between $50 to $100 per pair. While it may seem like an expense, it’s significantly more affordable than replacing your headlights, which can cost hundreds of dollars.
DIY vs. Professional Headlight Restoration
The decision to go the DIY route or hire a professional depends on your level of expertise, the time you can invest, and your desired results.
DIY Headlight Restoration:
Pros:
-
Cost-effective
-
Can be done at your own pace
-
Allows you to develop a new skill
Cons:
-
Requires time and effort
-
Success depends on your experience and technique
-
Results may vary based on the quality of the headlight restoration kit used
Professional Headlight Restoration:
Pros:
-
Guaranteed high-quality results
-
Time-saving
-
Professionals have the experience and expertise
-
Often includes warranties or satisfaction guarantees
Cons:
-
May be more expensive than a DIY kit
If you choose the DIY route, you’ll find a variety of headlight restoration kits available for purchase online or at auto parts stores. These kits typically include all the necessary materials and instructions to guide you through the process.
Finding a Headlight Restoration Service Near You
If you opt for professional services, you’ll want to find a reliable service provider near you. Here’s how to go about it:
Read Online Reviews and Testimonials
The internet is an excellent resource for finding customer reviews and testimonials using local services. These can give you valuable insights into the quality of service you can expect.
Check for Certification and Experience
Look for certified service providers with headlight lens restoration experience. A well-established business is more likely to provide a high level of service.
Request a Quote or Consultation
Contact potential service providers for a quote or consultation. This will give you an idea of their pricing and how they communicate with customers.
Inquire About the Restoration Process and Materials Used
It’s essential to understand the restoration process and the materials the service provider will use. This can help you determine the quality of the service.
One of the advantages of professional services is the convenience it offers. Many providers offer mobile services, which means they can come to your location, saving you time and effort.
FAQs
How long does headlight restoration last?
The longevity can vary, but it typically lasts anywhere from one to three years, depending on factors such as climate, driving conditions, and the quality of the restoration job.
Can cloudy headlights affect vehicle safety?
Yes, cloudy headlights can significantly impact vehicle safety. They reduce visibility at night, increasing the risk of accidents. Properly restored headlights improve safety by providing better illumination of the road ahead.
Is headlight restoration a viable solution for all headlight types?
Headlight restoration is suitable for most types of headlights, including plastic, polycarbonate, and glass. However, it may not be effective for headlights with severe physical damage, such as cracks or deep pitting.
Does headlight restoration work on colored or tinted headlights?
This is primarily designed for clear headlights. While it may improve the clarity of colored or tinted headlights, consulting with a professional is best to ensure it’s a suitable option.
Are there any DIY methods for headlight restoration?
Yes, there are various DIY headlight restoration kits available on the market. These kits provide the materials and instructions needed to restore your headlights at home.
What’s the typical warranty for professional headlight restoration?
The warranty for professional restoration services varies among service providers. Some offer warranties ranging from a few months to a few years, ensuring the longevity of the restoration.
Conclusion
Headlight restoration emerges as a pivotal element of vehicle care that elevates safety and enhances your car’s aesthetics. Whether you decide to take on the task of restoring your headlights personally or opt for the expertise of a professional service, the outcome remains consistent: your journeys on the road will be marked by increased clarity, heightened safety, and a brighter driving experience.
To embark on this transformative journey, visit our headlight restoration service today and reclaim the road with well-illuminated confidence. Don’t let cloudy headlights compromise your safety – take action now and rediscover the joy of driving with absolute clarity.